 Save to Pinterest
 My gym buddy texted me at 6 AM asking if I had anything protein-packed for her drive to the office, and I found myself raiding my pantry at that ungodly hour, realizing I had everything for these bars staring back at me. The irony wasn't lost—I'd been buying protein powder like it was going out of style but never actually baking with it. That morning, watching the peanut butter melt into honey while the smell filled my tiny kitchen, something clicked: why not make snacks that actually taste like dessert but pack the punch she needed? These Rice Krispie bars became my answer, a nostalgic candy bar reimagined through a fitness lens, and now they're the first thing people ask me to bring to potlucks.
I brought a pan of these to a late-night study session in college, and watching my friends devour them while cramming for exams—actually enjoying food that wasn't gas station sushi—made me realize texture and flavor matter even when you're running on caffeine and desperation. One friend even asked if I was selling them, which felt like the highest compliment a broke student could give.
Ingredients
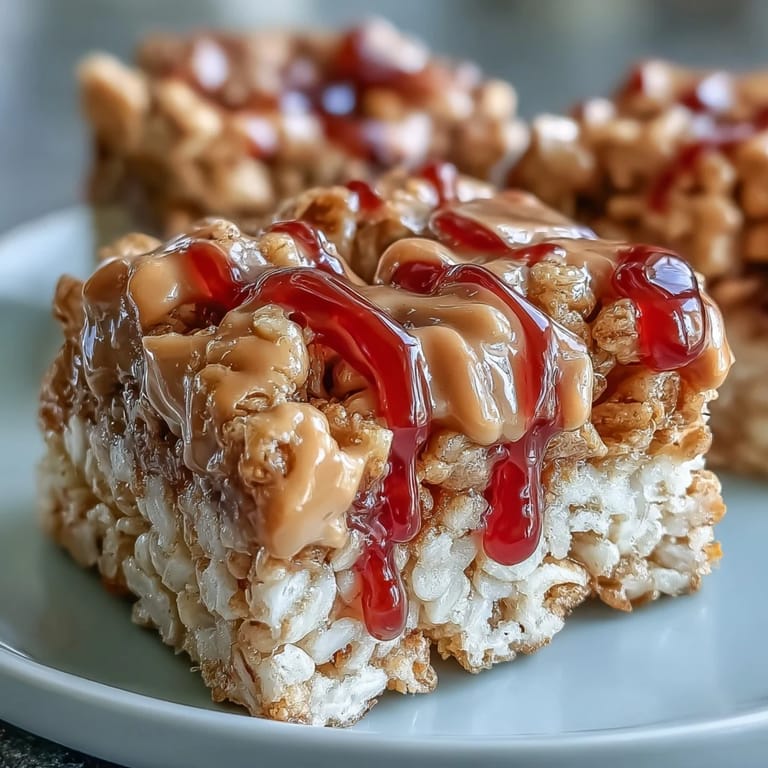
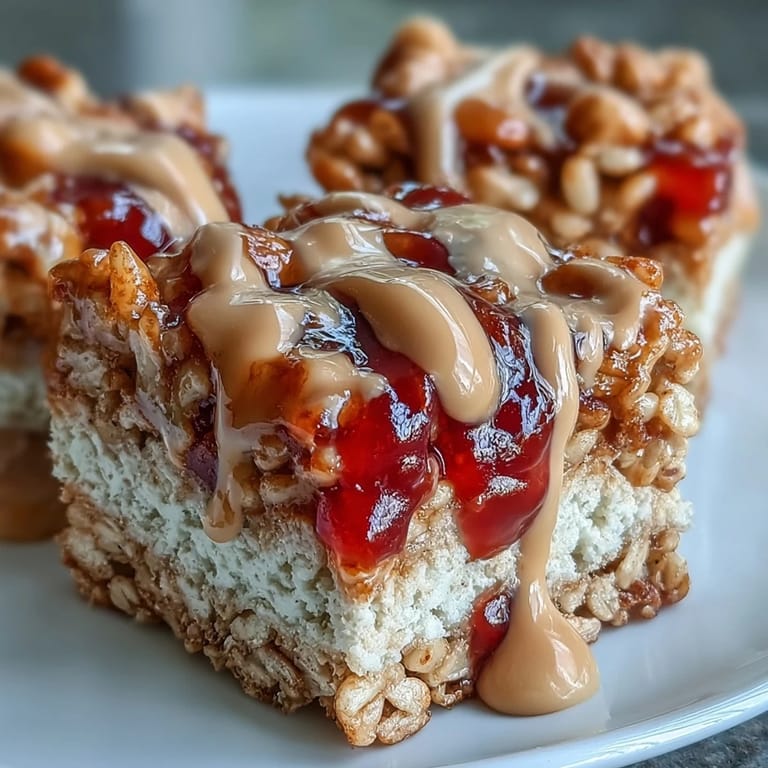
- Crisped rice cereal: Use the classic kind—it's the backbone here, and those airy pockets are what give you that satisfying snap when you bite through the creamy layers.
- Creamy peanut butter: The one cup in the base is where all the magic lives, so grab something smooth and reliable, not the natural oil-separated stuff unless you're feeling adventurous.
- Honey or maple syrup: Both work beautifully, but honey binds everything tighter while maple syrup adds a subtle earthiness that some people swear by.
- Vanilla or unflavored protein powder: This is your secret weapon—it adds nutrition without overpowering the peanut butter-and-jelly nostalgia that makes these bars irresistible.
- Fine sea salt: Just a quarter teaspoon cuts through the richness and makes the sweetness pop in ways coarse salt never could.
- Vanilla extract: A single teaspoon rounds out the flavor, though you could skip it if you're using vanilla protein powder and it already smells like a bakery.
- Peanut butter for drizzle: This gets mixed with more protein powder and a splash of milk, creating that elegant ribbon that makes these feel special.
- Strawberry or grape jelly: Slightly warmed, it spreads easier and swirls into the peanut butter like watercolor paint—any jam flavor works, so lean into whatever you're craving.
Tired of Takeout? 🥡
Get 10 meals you can make faster than delivery arrives. Seriously.
One email. No spam. Unsubscribe anytime.
Instructions
- Prepare your pan:
- Line an 8x8-inch baking pan with parchment paper, making sure it overhangs the edges so you can lift the whole batch out later—trust me, this single step saves you from frustration.
- Melt the base:
- Heat one cup of peanut butter with honey over low heat, stirring occasionally until it's smooth and glossy, which takes about three to four minutes. This gentle approach keeps the peanut butter from breaking while the honey dissolves in.
- Build the mixture:
- Remove from heat and stir in vanilla extract, salt, and protein powder until there are no streaks left, then fold in the rice cereal carefully so you don't crush those precious air pockets. The mixture should feel thick and cohesive, almost like you're working with wet sand that wants to hold together.
- Press and set:
- Pour everything into your prepared pan and press firmly with a spatula, working from the center outward so the layer is even and compact. Don't be timid here—you want these bars to hold their shape when you cut them later.
- Create the protein drizzle:
- In a small bowl, whisk together a third cup of peanut butter, two tablespoons of protein powder, and milk until you get a thick, pourable consistency that moves like honey but doesn't disappear into the base. This usually takes two to three tablespoons of milk, depending on how thick your peanut butter is.
- Add the jelly swirl:
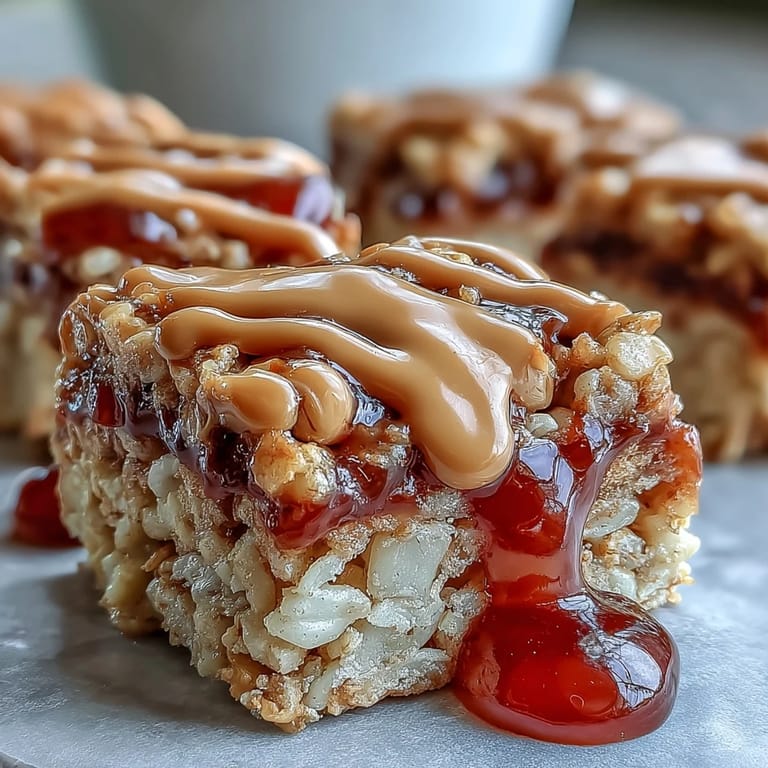
- Drizzle the protein mixture in thin lines across the surface, then warm your jelly slightly and drop spoonfuls between those lines. Grab a knife or skewer and drag it through the jelly and peanut butter in alternating directions, creating that marbled effect that looks restaurant-quality.
- Chill and cut:
- Refrigerate for at least forty minutes until everything is set and firm to the touch—patience here prevents you from ending up with crumbly pieces. Once chilled, use the parchment overhang to lift the whole slab out, then cut into twelve even bars with a sharp knife, wiping the blade between cuts for clean edges.
 Save to Pinterest
 One Saturday afternoon, my nephew watched me make these from the kitchen counter stool, asking a million questions about why the peanut butter turned into foam and why we couldn't just eat it warm. When the bars finally came out of the fridge and he bit into one, his face lit up like he'd discovered treasure, and suddenly I understood that these weren't just snacks—they were small moments of care translated into something edible.
Flavor Combinations to Explore
Once you nail the classic strawberry-peanut butter combo, the world opens up in the best way. I've swapped grape jelly for apricot jam and found it brings a tangy sophistication that makes you close your eyes when you bite into it. Raspberry is bold and slightly tart against the creamy peanut butter, creating this dynamic tension that somehow works perfectly. Even blackberry jam, which sounds unconventional, adds a deep berry note that feels almost gourmet when paired with vanilla protein powder.
Storing and Making Ahead
These bars actually improve slightly after a day or two in the fridge as the flavors settle and integrate, so making a batch early in the week means you've got grab-and-go breakfasts sorted. Keep them in an airtight container separated by parchment layers so they don't stick together, and they'll hold beautifully for up to a week, though honestly they rarely last that long in my house. If you want to meal-prep aggressively, you can even assemble them without the jelly swirl, then add that fresh topping a day or two before eating to keep everything looking pristine.
Customizing for Your Dietary Needs
The backbone of this recipe is flexible enough to bend toward whatever you're working with, whether that's allergies, preferences, or just what's already in your pantry. Sunflower seed butter swaps in seamlessly if peanuts are off the table, and almond butter creates a slightly more delicate flavor that some people actually prefer. For vegan friends, maple syrup replaces honey perfectly, and as long as your protein powder and cereal check the labels, you're golden—I've made batches where nobody even knew they were eating plant-based until I told them afterward.
- Chocolate protein powder transforms these into a whole different dessert that tastes like a candy bar.
- If you're avoiding added sugar, a monk fruit or allulose sweetener can replace the honey measure-for-measure.
- Rice Krispies alternatives like puffed quinoa or millet cereal work if you need a gluten-free option.
 Save to Pinterest
 These bars represent something I've come to love about cooking at home: taking something as simple as a childhood snack and making it genuinely nourishing without losing an ounce of joy. Wrap one up and hand it to someone you care about—they'll taste both the peanut butter and the effort.
Recipe Help Center
- → How long do these bars keep fresh?
Store these bars in an airtight container in the refrigerator for up to one week. The chilled texture becomes wonderfully firm, making them easy to grab and enjoy. You can also freeze individually wrapped bars for up to three months—just thaw in the refrigerator overnight.
- → Can I use a different nut butter?
Absolutely. Almond butter, sunflower seed butter, or cashew butter work beautifully as substitutes for peanut butter. Keep in mind that different nut butters have varying consistencies, so you may need to adjust the milk slightly when making the protein drizzle to achieve the right pourable texture.
- → What type of protein powder works best?
Vanilla or unflavored whey or casein protein powder blends seamlessly into the mixture and adds a subtle creaminess. Plant-based protein powders also work well, though they may absorb more liquid. Avoid strongly flavored proteins that might compete with the peanut butter and jelly flavors.
- → Can I make these dairy-free?
Yes. Use maple syrup instead of honey, choose a plant-based protein powder, and opt for dairy-free milk in the drizzle. Most peanut butters are naturally dairy-free, but always check labels to ensure no added milk ingredients. The texture and flavor remain delicious with these simple substitutions.
- → Why should I warm the jelly before swirling?
Warming the jelly slightly makes it more fluid and easier to swirl beautifully across the peanut butter drizzle. Cold jelly can be thick and tear through the soft base, while warmed jelly creates smooth, marble-like patterns. Just 10-15 seconds in the microwave or a minute on the stovetop is all you need.
- → Can I double this recipe?
Certainly. Use a 9x13-inch baking pan and expect slightly thicker bars. The chilling time may increase slightly to ensure the center sets completely. Double batches are perfect for meal prep, parties, or sharing with friends and family who love this protein-packed twist on a classic.