 Save to Pinterest
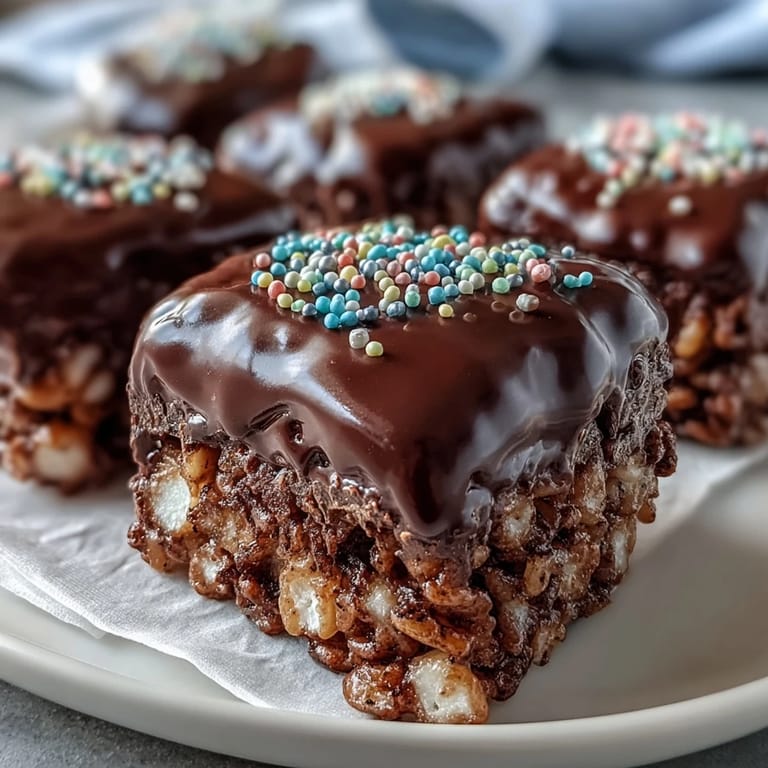
 My daughter brought home a crumpled handout from school announcing a bake sale, and I panicked until I remembered these chocolate-dipped squares sitting in my mental recipe box. I had made them years ago for a potluck and watched them vanish faster than anything else on the table. That evening, we cleared the counter, turned on some music, and spent an hour pressing warm, buttery cereal into a pan before drowning it in melted chocolate. The kitchen smelled like a candy shop, and by morning, we had two dozen gleaming bars ready to go.
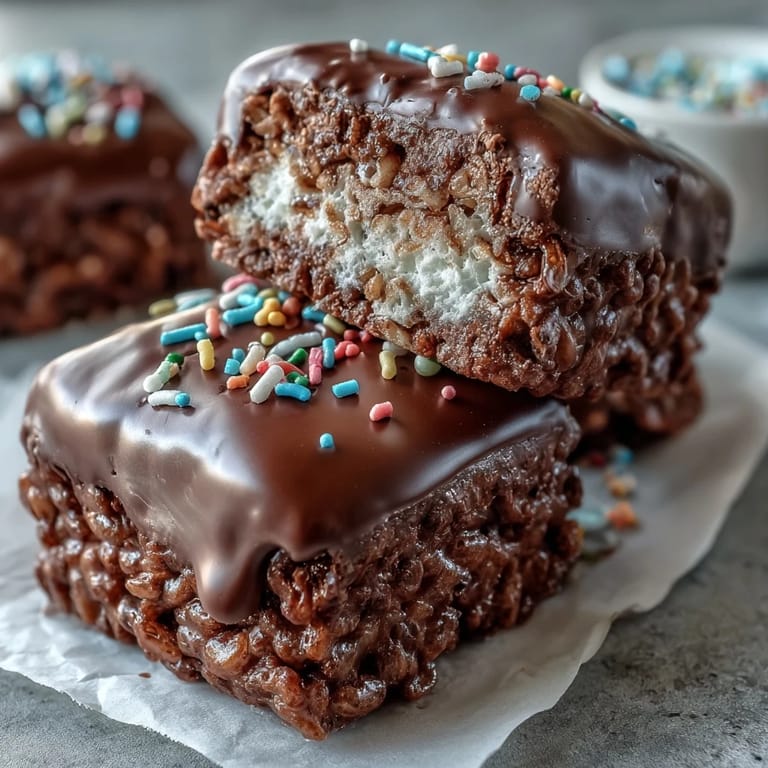
I learned to press the cereal mixture firmly into the pan after my first attempt crumbled into a pile of loose squares that refused to hold their shape. My neighbor once told me she uses a sheet of parchment and a second pan to press down evenly, and that trick changed everything. Now every batch comes out with clean edges and a uniform thickness that makes slicing them almost meditative. I also started letting the base cool completely before adding the chocolate, because rushing that step once left me with a streaky, half-melted mess.
Ingredients
- Unsalted butter: This is what makes the marshmallow mixture glossy and smooth, so do not skip the step of greasing your spatula with a little extra butter to prevent sticking.
- Mini marshmallows: They melt faster and more evenly than the large ones, which means less time stirring and less risk of scorching.
- Rice Krispies cereal: The original brand has a specific texture that holds up under the weight of the marshmallow without turning soggy.
- Fine sea salt: A small pinch cuts through the sweetness and makes the chocolate topping taste richer.
- Semisweet or dark chocolate chips: I prefer semisweet for balance, but dark chocolate adds a grown-up edge if you are serving these at an evening gathering.
- Vegetable oil or coconut oil: A teaspoon thins the melted chocolate just enough to spread smoothly without clumping.
- Rainbow sprinkles or chopped nuts: These are optional, but they add color and texture that make each bar feel a little more festive.
Tired of Takeout? 🥡
Get 10 meals you can make faster than delivery arrives. Seriously.
One email. No spam. Unsubscribe anytime.
Instructions
- Prepare the pan:
- Grease your 8x8-inch or 9x9-inch square baking pan with butter, paying special attention to the corners where the mixture tends to stick. If you have parchment paper, line the pan and let the edges hang over for easy lifting later.
- Melt the butter:
- Place the butter in a large saucepan over low heat and stir constantly until it liquefies without browning. Low and slow is the key here, because burnt butter will give the whole batch a bitter edge.
- Add the marshmallows:
- Stir in the mini marshmallows and keep stirring until they collapse into a smooth, creamy pool. This usually takes about three to four minutes, and you will know it is ready when no white streaks remain.
- Season the mixture:
- Remove the pan from the heat and stir in the sea salt if you are using it. The residual heat will distribute it evenly.
- Fold in the cereal:
- Add the Rice Krispies and fold gently with a spatula until every piece is coated in marshmallow. Avoid crushing the cereal, because that crunch is what makes these bars so satisfying.
- Press into the pan:
- Transfer the mixture to your prepared pan and press it down firmly with a buttered spatula or your hands. The more even the pressure, the neater your final squares will be.
- Let it rest:
- Allow the base to sit at room temperature for about ten minutes so it firms up slightly before you add the chocolate.
- Melt the chocolate:
- Combine the chocolate chips and oil in a microwave-safe bowl and heat on medium power in thirty-second intervals, stirring after each one. The chocolate should be glossy and smooth, with no lumps.
- Coat the top:
- Pour the melted chocolate over the cooled cereal base and spread it evenly with an offset spatula or the back of a spoon. Work quickly, because the chocolate will start to set as it cools.
- Add garnishes:
- Immediately scatter rainbow sprinkles or chopped nuts over the wet chocolate so they stick. This is your chance to get creative with colors and textures.
- Set the chocolate:
- Let the bars sit at room temperature for at least one hour, or refrigerate for twenty to thirty minutes if you are in a hurry. The chocolate should feel firm to the touch before you cut.
- Cut into bars:
- Lift the block from the pan using the parchment overhang, or invert it onto a cutting board. Use a sharp knife to slice into twelve to sixteen bars, wiping the blade between cuts for clean edges.
 Save to Pinterest
 The first time I brought these to a birthday party, a friend asked if I had ordered them from a bakery. I laughed and told her the truth, and by the end of the night she had texted me twice asking for the recipe. There is something about the glossy chocolate shell and the bright sprinkles that makes people assume they are more complicated than they really are. I have made them for school events, office potlucks, and last-minute hostess gifts, and every time someone asks how I pulled it off so quickly.
Flavor Variations to Try
Once you have mastered the classic version, you can experiment with different extracts and toppings. A half teaspoon of peppermint extract stirred into the melted marshmallows turns these into a holiday treat, especially if you use crushed candy canes instead of sprinkles. Almond extract and a drizzle of white chocolate create a sophisticated twist that works well for bridal showers or afternoon tea. I have also swapped the semisweet chocolate for white chocolate and topped the bars with freeze-dried strawberries for a spring dessert that looks as good as it tastes.
Storage and Make-Ahead Tips
These bars keep surprisingly well if you store them in an airtight container at room temperature for up to three days, or in the refrigerator for up to a week. I like to layer them between sheets of parchment paper to prevent the chocolate from sticking. If you need to make them ahead for an event, you can freeze the uncut block for up to a month, then thaw it overnight in the fridge before slicing. The texture stays just as crisp, and the chocolate does not lose its shine. Just avoid leaving them in a warm room for too long, because the chocolate will start to soften and the bars can become sticky.
Serving Suggestions
I usually arrange these bars on a platter with a few extra sprinkles scattered around the edges for a festive look. They pair beautifully with cold milk, hot coffee, or even a scoop of vanilla ice cream if you are feeling indulgent. For kids' parties, I sometimes cut them into smaller squares and stack them in a pyramid, which always gets a reaction. If you are serving them at an adult gathering, consider drizzling a little salted caramel over the chocolate or adding a sprinkle of flaky sea salt on top for a more refined finish.
- Arrange them on a cake stand for a simple but impressive dessert table centerpiece.
- Wrap individual bars in clear cellophane and tie them with ribbon for party favors or gifts.
- Serve them alongside fresh berries and whipped cream for a playful dessert board.
 Save to Pinterest
 Every time I make these, I am reminded that the best recipes are the ones that let you relax and enjoy the process without worrying about perfection. These bars are forgiving, fun, and always worth the little bit of effort it takes to melt the chocolate and press everything into place.
Recipe Help Center
- → How long do chocolate covered treats stay fresh?
Store in an airtight container at room temperature for up to 3 days. The chocolate may soften slightly in warm environments. Refrigerate for up to a week for firmer texture and extended freshness.
- → Can I use white chocolate instead of semisweet?
Absolutely. White chocolate works beautifully and creates a lovely contrast. Pair with pastel sprinkles for a decorative look. White chocolate may soften faster at room temperature, so refrigeration helps maintain shape.
- → Why add oil to the chocolate?
The oil helps the chocolate melt smoothly and creates a glossy, professional finish. It also prevents the coating from becoming too hard or brittle when set, ensuring a pleasant snap without cracking.
- → How do I prevent the marshmallow mixture from sticking?
Butter your spatula or hands lightly before pressing the mixture into the pan. Some cooks also coat the pan with butter or line with parchment paper for easy removal after setting.
- → Can I freeze these for later?
Yes, freeze individually wrapped bars for up to 2 months. Thaw at room temperature for about 30 minutes before serving. The chocolate may develop slight condensation but will regain its original texture.
- → What type of cereal works best?
Traditional puffed rice cereal creates the classic texture. Store-brand crisped rice works equally well. Avoid coated or frosted varieties as they may become overly sweet when combined with marshmallows and chocolate.