 Save to Pinterest
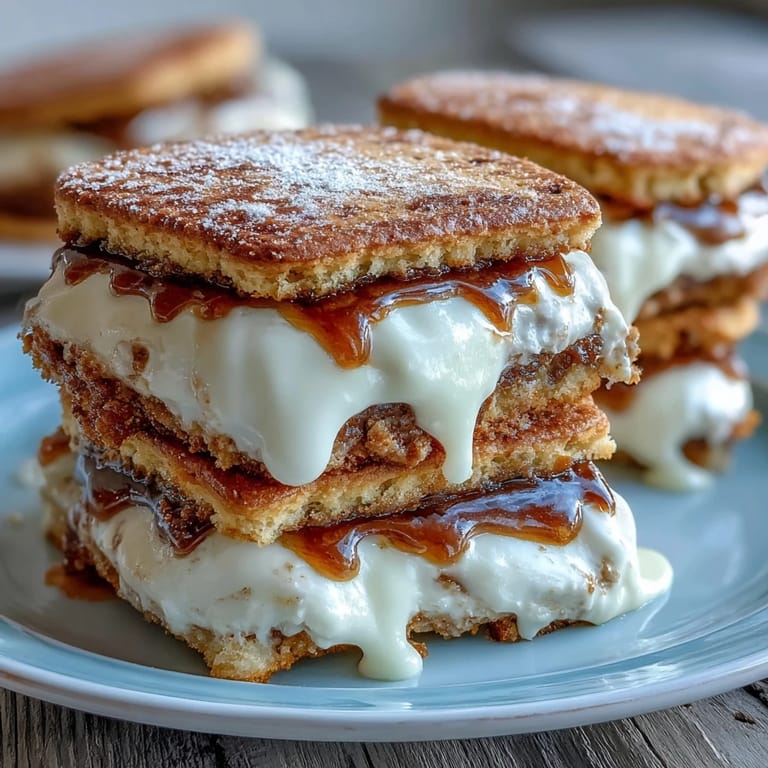
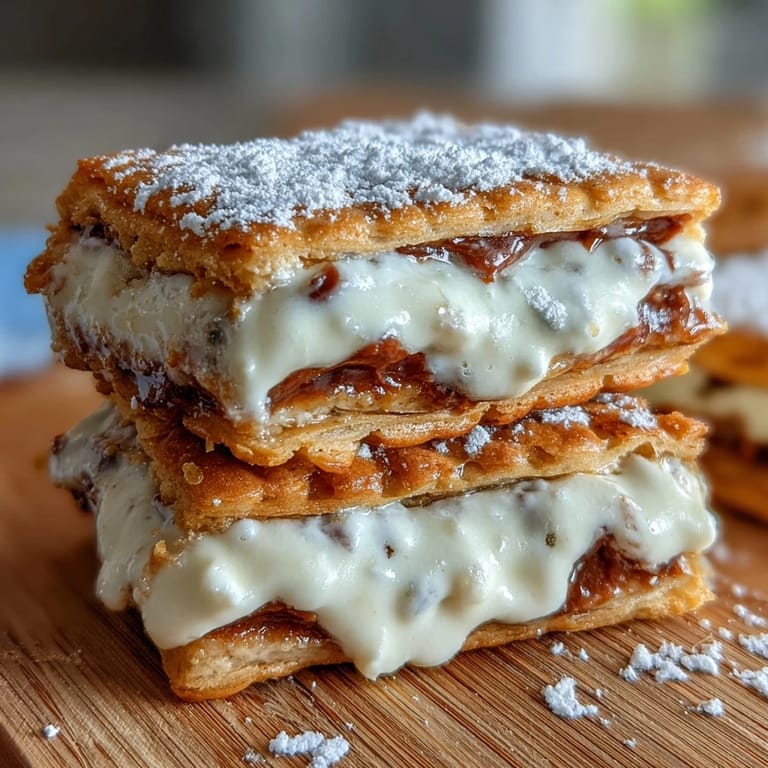
 There's something enchanting about baking cookies inspired by a video game—it feels almost rebellious, like I'm bringing a fictional world into my actual kitchen. The first time I made these Milk Cookies, I was struck by how the delicate, buttery discs transformed into something almost elegant once filled with that pillowy vanilla cream. My partner walked in mid-bake and asked if they were store-bought, which felt like the highest compliment. Now whenever I make a batch, I can't help but smile at how a simple sweet treat became this little moment of joy in our home.
I brought these to a friend's game night, and watching everyone's faces light up when they bit into the cream filling was worth every minute. One person actually said they tasted like a memory, which is exactly what these cookies should be—something that lingers just a little longer than usual.
Ingredients
- All-purpose flour (240 g): This is your foundation, and measuring by weight rather than volume makes a real difference in consistency across batches.
- Unsalted butter, softened (115 g for dough, 60 g for filling): Softened butter creams beautifully and gives the cookies that tender, delicate crumb you're after.
- Granulated sugar (130 g): This sweetens and helps create that slight crisp on the cookie edges while keeping the center soft.
- Large egg: Binds everything together and adds richness without overpowering the delicate vanilla flavor.
- Milk (30 ml for dough, 15 ml for filling): A small amount keeps the dough tender and helps the cream filling come together smoothly.
- Vanilla extract (1 tsp for dough, 1 tsp for filling): Use real vanilla if you can; it makes the flavor feel warmer and more complex.
- Baking powder (1/2 tsp): Just enough to give the cookies a subtle lift without making them cake-like.
- Salt (1/4 tsp): Balances the sweetness and makes the vanilla sing.
- Powdered sugar, sifted (120 g): Sifting removes lumps and ensures your cream filling is silky smooth.
Tired of Takeout? 🥡
Get 10 meals you can make faster than delivery arrives. Seriously.
One email. No spam. Unsubscribe anytime.
Instructions
- Get everything ready:
- Preheat your oven to 350°F and line two baking sheets with parchment paper. Having everything prepared means you can move through the recipe without stopping to hunt for supplies.
- Mix the dry ingredients:
- In a bowl, whisk together your flour, baking powder, and salt. This distributes the leavening evenly and aerates the flour slightly, which helps create tender cookies.
- Cream the butter and sugar:
- In a large bowl, beat the softened butter and sugar together for about 2-3 minutes until the mixture is pale and fluffy. Listen for that change in sound—it tells you the butter has incorporated enough air.
- Add the wet ingredients:
- Beat in the egg, milk, and vanilla extract until everything is combined and the mixture looks smooth. This usually takes about a minute, and you'll notice the mixture becomes slightly lighter in color.
- Bring the dough together:
- Gradually add the dry ingredients to the wet mixture, stirring just until a soft dough forms. Overmixing develops gluten and makes cookies tough, so stop as soon as everything is combined.
- Shape the cookies:
- Roll the dough into 1-inch balls and space them about 2 inches apart on your prepared baking sheets. Then gently flatten each ball with your palm or the bottom of a glass to about 1/4-inch thickness—this ensures even baking.
- Bake until golden:
- Bake for 10-12 minutes, watching until the edges just begin to turn golden while the centers still look slightly underbaked. The cookies will continue cooking on the hot baking sheet after you remove them, so resist the urge to overbake.
- Make the filling:
- While cookies cool, beat the softened butter until completely smooth, then gradually add the sifted powdered sugar. Once combined, add milk and vanilla extract, beating until the filling is fluffy and spreadable.
- Assemble the sandwiches:
- Spread or pipe about 1 tablespoon of cream filling onto the flat side of half the cookies, then press the remaining cookies on top, flat side down. This creates those beautiful sandwich cookies with visible filling on the sides.
 Save to Pinterest
 There's a quiet satisfaction in making something that feels special, especially when it's something you've never attempted before. These cookies somehow turned a playful inspiration into a genuine favorite in our rotation.
Flavor Variations to Explore
The vanilla base is perfect for experimentation once you've made the recipe once. I've added almond extract to half a batch and loved how it gave everything a subtle sophistication, or you could incorporate cocoa powder into the dough for a chocolate version, or even a hint of lemon zest for brightness. The filling is equally flexible—a touch of almond extract, a pinch of cinnamon, or even a tiny bit of coffee extract can completely change the character of these cookies while keeping the technique exactly the same.
Storage and Make-Ahead Strategy
I've found that these cookies actually taste even better on day two, when the flavors have had time to meld together. You can store unfilled cookies in an airtight container for up to a week and assemble them fresh as needed, or fill them and store the whole sandwiches for up to three days. If you're planning ahead, bake the cookies a day before, store them unfilled, and assemble just before serving for the best texture and appearance.
The Details That Matter
Precision in baking isn't about being fussy—it's about understanding how ingredients work together. These cookies depend on softened butter that's actually soft, not melted; on properly measured flour that isn't packed into the measuring cup; and on restraint during baking so they stay tender instead of crispy. The difference between a good batch and a truly memorable batch often comes down to these small choices, which is why I always take a moment to really pay attention to the texture and color rather than just setting a timer and walking away.
- Use room-temperature egg and milk for smoother mixing and better incorporation into the dough.
- If your kitchen is warm, chill the dough for 15 minutes before rolling it into balls to make it easier to handle.
- A light dusting of sprinkles on the filling edges before the cookies set adds a beautiful finishing touch.
 Save to Pinterest
 Making these cookies is less about following instructions and more about creating a moment where something magical happens in your kitchen. Share them with someone you care about.
Recipe Help Center
- → What makes the cookies tender and soft?
Using a combination of butter, milk, and careful creaming of sugar and butter ensures the cookies remain tender and soft after baking.
- → How do I prevent the cookies from spreading too much during baking?
Chilling the dough before baking and spacing dough balls adequately helps cookies hold their shape without excessive spreading.
- → Can I substitute any ingredients to adjust flavors?
Yes, adding cocoa powder to the dough creates a chocolate twist, and vanilla extract enhances the flavor of both cookies and filling.
- → How should the cream filling be prepared for best texture?
Beating the butter until smooth before gradually incorporating powdered sugar, milk, and vanilla results in a fluffy, spreadable cream filling.
- → What is the best way to store these sandwich treats?
Keep them in an airtight container at room temperature for up to three days to preserve freshness and texture.