 Save to Pinterest
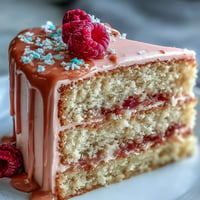
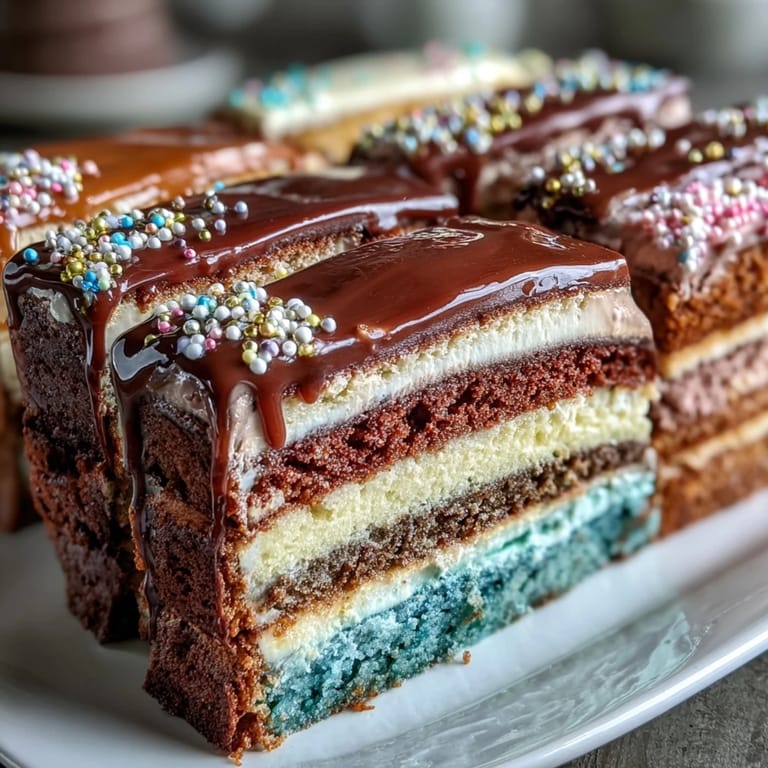
 My cousin called me three weeks before her graduation with a wild request: could I bake her a cake that looked like a sunrise? She wanted something that would photograph well for Instagram but also taste incredible at her backyard party. I'd never attempted an ombre layer cake before, but standing in her kitchen watching her describe her vision—those golden yellows melting into soft pinks—I knew this was the project that would finally push me to master multicolored baking. The result wasn't just beautiful; it became the centerpiece everyone remembered most about that celebration.
I'll never forget the moment my cousin's friends arrived and nobody could believe I'd made the cake myself—one girl asked for my bakery's business card, which honestly made my entire year. What started as nervous anticipation turned into pure joy watching people Instagram every angle of those gradient layers before cutting into them. That cake taught me that desserts can be showstoppers without being pretentious or impossibly difficult.
Ingredients
- All-purpose flour (3 1/4 cups): The foundation that keeps your layers tender and level; I've learned to spoon and level rather than scoop directly from the bag, which prevents packing and ensures consistent rise.
- Baking powder (2 1/2 tsp): Your leavening agent that creates a delicate crumb; make sure yours hasn't been sitting in your cabinet for two years or the cake will bake dense and disappointing.
- Salt (1/2 tsp): This tiny amount awakens all the other flavors and prevents the cake from tasting one-dimensionally sweet.
- Unsalted butter (1 cup, softened): Room temperature is non-negotiable here—cold butter won't cream properly and warm butter produces greasy cake with poor rise.
- Granulated sugar (2 cups): Creamed with butter to incorporate tiny air pockets that give the cake its delicate structure and light texture.
- Large eggs (4, room temperature): Cold eggs won't emulsify smoothly, so pull them out of the fridge 30 minutes before starting; they're what binds everything together.
- Vanilla extract (1 tbsp): Use real vanilla if you can—imitation works in a pinch, but the authentic stuff adds a subtle sophistication that people taste even if they can't identify it.
- Whole milk (1 1/4 cups, room temperature): This hydrates the flour and creates a tender crumb; cold milk tightens the batter and can cause uneven baking.
- Gel food coloring: Absolutely essential over liquid coloring because liquid food dyes add moisture that throws off your batter consistency and muddy your colors faster than you'd expect.
- Egg whites (6 large) and granulated sugar (1 1/2 cups): The Swiss meringue buttercream base that transforms into clouds—never use even one drop of yolk or your meringue won't whip properly.
- Unsalted butter (1 1/2 cups, cubed and softened): Cubing and softening ensures it incorporates smoothly into the meringue without curdling the delicate emulsion.
Tired of Takeout? 🥡
Get 10 meals you can make faster than delivery arrives. Seriously.
One email. No spam. Unsubscribe anytime.
Instructions
- Prepare Your Pans and Preheat:
- Set your oven to 350°F and take a moment to grease all four 8-inch pans generously, then line the bottoms with parchment circles—this prevents sticking disasters that ruin celebration cakes. This is not the step to rush or skip.
- Whisk Your Dry Ingredients:
- Combine flour, baking powder, and salt in a medium bowl, breaking up any lumps with your whisk so your batter bakes evenly. This aeration prevents dense pockets in your finished layers.
- Cream Butter and Sugar:
- In a large bowl, beat softened butter with sugar for 3–5 minutes until the mixture turns pale and fluffy like clouds—this is where the magic happens, trapping tiny air bubbles that create your tender crumb. Don't skip this step even if you're impatient; it's the foundation of a light cake.
- Add Eggs One at a Time:
- Drop in each egg individually and mix well before adding the next, which ensures they emulsify properly rather than sitting in oily puddles. This patience pays off in texture.
- Mix in Vanilla:
- Stir in vanilla extract until just combined; overdoing it can sometimes cause slight separation in the batter.
- Alternate Flour and Milk:
- Begin with flour, then milk, then flour again, mixing gently after each addition until just combined—this prevents overmixing, which toughens the gluten and ruins your tender crumb. The batter should come together smoothly without visible flour streaks.
- Divide and Tint Your Batter:
- Pour your base batter into four bowls and add increasing amounts of gel food coloring to each, stirring gently but thoroughly to distribute the color evenly—this is where your ombre effect begins. Bowl one gets the lightest tint, bowl four gets the deepest.
- Fill Pans and Smooth Tops:
- Divide each colored batter into its corresponding prepared pan, smoothing the top gently with an offset spatula so your layers bake level. Uneven tops create wonky stacks later.
- Bake with Confidence:
- Bake for 22–25 minutes, checking at 22 by inserting a toothpick in the center—it should come out clean or with just a few crumbs, not wet batter. Every oven runs slightly different, so start checking a minute or two early.
- Cool Properly:
- Let cakes rest in pans for 10 minutes (this allows them to set slightly so they don't break), then turn out onto wire racks to cool completely, which takes roughly an hour. Never frost a warm cake or your buttercream will melt into sadness.
- Make Swiss Meringue Buttercream Base:
- Whisk egg whites and sugar in a heatproof bowl set over simmering water, stirring constantly until the sugar dissolves and the mixture reaches 160°F—you'll notice it goes from grainy to silky smooth. This temperature kills any salmonella concerns and ensures safety.
- Whip to Stiff Peaks:
- Transfer your warm mixture to a stand mixer and whip on high speed for about 10 minutes until stiff peaks form and the bowl cools to room temperature—this aerates your buttercream and gives it that luxurious texture. You'll know it's ready when it doubles in volume and looks like fluffy white clouds.
- Add Butter Gradually:
- Add softened butter a few cubes at a time, beating well between additions, which prevents the buttercream from breaking or becoming grainy. If it looks curdled momentarily, keep beating—it'll come back together.
- Finish with Vanilla and Color:
- Stir in vanilla extract and divide the buttercream into portions to tint with gel coloring if you want to match your cake layers. This step is optional but creates a stunning layered effect.
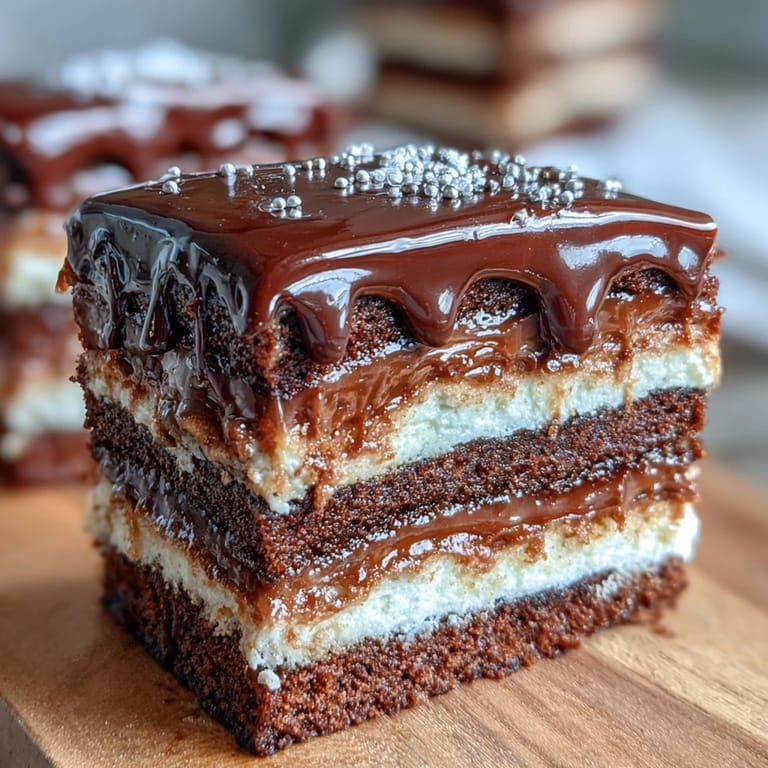
- Assemble with Care:
- Place your darkest cake layer on a cake stand or plate, spread with a generous layer of buttercream (about 1/4 inch thick), then repeat with remaining layers from darkest to lightest, creating that beautiful ombre gradient. Take your time to keep the stack level.
- Apply Crumb Coat:
- Frost the entire assembled cake with a thin, sealing layer of buttercream to catch all the crumbs, then refrigerate for 20 minutes—this step prevents crumb disaster when you apply your final frosting. It's a professional trick that feels worth the wait.
- Final Frosting and Decoration:
- Apply your final buttercream layer smoothly, blending colors gently with an offset spatula if creating an ombre effect on the outside. Top with edible pearls, a graduation cake topper, or piped details that make it uniquely celebratory.
- Chill and Serve:
- Refrigerate until the frosting sets firmly, then bring the cake to room temperature for 30 minutes before serving so the flavors shine and the crumb stays tender. Cold cake tastes muted and dense; room temperature brings everything to life.
 Save to Pinterest
 Standing in my cousin's kitchen the morning after her graduation party, looking at the few remaining slices of cake, I realized this wasn't just about feeding people—it was about creating a memory they'd mention years later. When her mom called me weeks after to say her friends were still talking about the cake, I understood that sometimes the most meaningful gifts aren't the most complicated ones, just the ones made with genuine care.
Mastering the Ombre Effect
The ombre gradient that makes this cake showstopping isn't magic—it's just strategic color mixing. I learned that starting with white batter and adding gel coloring in increasing amounts to each successive bowl creates the smoothest, most cohesive gradient. The key is keeping your hand steady as you increase the color, adding just a tiny bit more to each new bowl so the transition feels natural rather than jarring. Some bakers try to guess the amounts, but I now measure: start with 1 tiny toothpick dip, then 2, then 3 or 4, depending on how dramatic you want your gradient. Light colors stay delicate and elegant, while deep colors photograph beautifully without looking artificial or overwhelming.
Swiss Meringue Buttercream Secrets
The first time I made Swiss meringue buttercream, it broke and looked like scrambled eggs, which was horrifying and taught me a crucial lesson: temperature and timing matter absolutely. The egg white and sugar mixture must reach exactly 160°F over gently simmering water—too cool and your buttercream won't stabilize, too hot and you risk cooking the eggs unevenly. Once whipped to stiff peaks, it should look like meringue clouds, and when you add butter, it'll temporarily look broken before suddenly becoming silky again. Never panic; just keep beating. This buttercream is firmer and more stable than American buttercream, which means it holds piped details beautifully and doesn't weep in warm rooms, making it ideal for decorated celebration cakes.
Troubleshooting and Timeline Tips
This cake benefits from advance planning because you can bake the layers a day ahead, wrap them tightly, and frost the next day when you're fresh and confident. The buttercream stays perfectly fine in the refrigerator for up to 5 days, which takes pressure off if you're celebrating a milestone and have a million other things to juggle. I've learned that bringing everything to room temperature before serving is non-negotiable—cold cake tastes dense and one-dimensional, but room-temperature cake tastes rich, buttery, and genuinely delicious.
- If your buttercream looks grainy or broken after adding butter, increase the mixer speed slightly and keep beating; it almost always comes back together within a few minutes.
- Invest in an oven thermometer because every oven bakes differently, and knowing your actual temperature prevents overbaking or underbaking surprises.
- Level your cake layers with a serrated knife or cake leveler before assembling so your stack stands tall and proud rather than tipsy.
 Save to Pinterest
 This cake isn't just for graduations—it celebrates any moment worth remembering with beauty and butter. Make it, share it, and watch people's faces light up when they realize something this stunning came from your own kitchen.
Recipe Help Center
- → How is the ombre effect achieved in the layers?
The batter is divided into equal parts and each portion is tinted with increasing amounts of gel food coloring, creating a graduated color effect once baked and stacked.
- → What makes Swiss meringue buttercream different?
It is made by gently heating egg whites and sugar, then whipping them into a glossy meringue before incorporating softened butter for a smooth, silky texture.
- → Can I prepare the cake layers in advance?
Yes, the layers can be baked ahead of time, cooled completely, wrapped, and refrigerated or frozen until ready to assemble and frost.
- → What tools are recommended for the decoration?
Using piping bags with decorative tips and an offset spatula helps achieve smooth buttercream application and intricate detailing like borders or pearls.
- → How can I intensify the cake colors?
Gel food coloring is preferred for vibrant hues, and adding cocoa powder in increasing amounts can create a rich chocolate ombre effect.